A few weeks ago, I read about the release of DeepSeek-R1 .
An apparently open-source model that can run on relatively affordable hardware in distilled versions. This immediately caught my interest. I wanted to run AI models on my own hardware (being oldskool and all) and learn about training, fine-tuning, inference, and development.

Choosing the hardware
The first step was building a machine that I could afford while ensuring it could run decent distilled models.
My choice : 2 (yes two!) NVIDIA RTX 3090 GPUs, each featuring 24GB of VRAM, connected via NVLink at a high-speed bandwidth of 56.248 GB/s (4×14.062), effectively providing 48GB of VRAM.
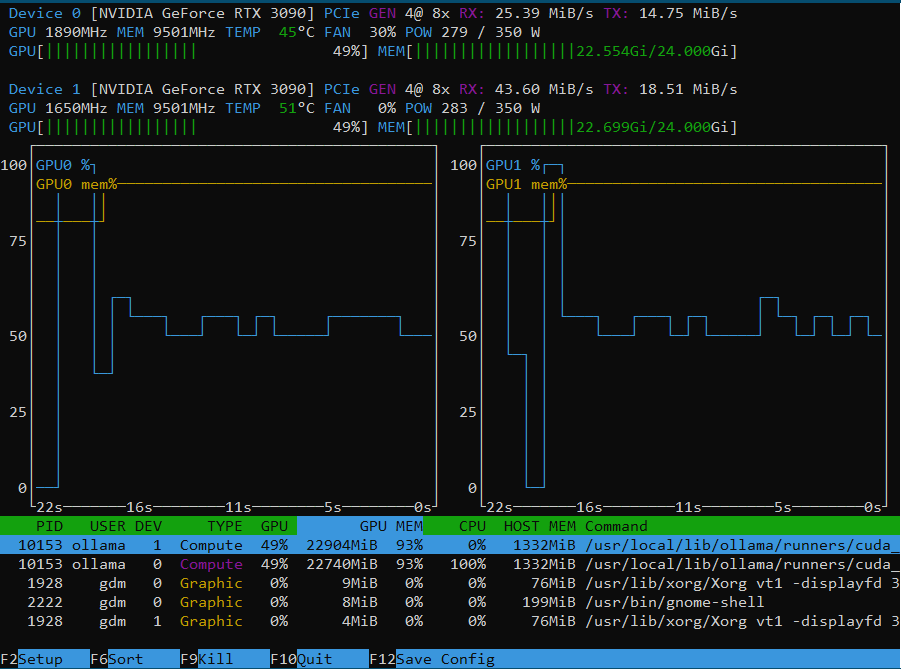
This setup would allow me to run models like DeepSeek-R1-Distill-Llama-70B.
However, the process turned out to be more complicated than I expected.
Problems
The NVLink bridge required for RTX 3090 cards is rare and expensive.
The NVLink (former SLI) bridges used for RTX Titan, RTX 2000 series etc. are not compatible.
Slot Spacing Issues:
The official NVIDIA NVLink bridge for the RTX 3090 is a four-slot bridge, meaning there must be two empty slots between the PCIe 4.0 slots used for the GPUs.
Motherboard
However, finding a modern consumer motherboard with this spacing is difficult, if not impossible.
You can link RTX 3090 cards of different brands, but the NVLink connectors are not always in the same position.
You can use NVLink for RTX A6000, which is available in 3-slots, however you need 2 cards with NVLink connector at same position and one card should be less or equal to 2 slots and you will have heating issues.
It could perhaps be solved using water cooling for atleast one card, to give it a low enough profile and enough cooling.
Solution
I opted for a case large enough to simulate a 2 slot spacing with good airflow
I used a PCIe 4.0 riser cable to adjust the spacing and allow for correct placement to fit the NVLink.
To accommodate the riser cable, I combined a card with a wider PCB (Founders Edition) with one that had a narrower PCB (ZOTAC Trinity OC), ensuring enough room for placement.
Final hardware setup
- Case: Lian Li Lancool 216 (a very spacious mid-tower case)
- Motherboard: MSI MEG Unify Z690 (only one-slot spacing between PCIe 4.0 connectors, but supports x8/x8 bandwidth)
- CPU: Intel i9-13900K (24 cores)
- Cooling: AIO Water Cooler FX360 INF for CPU (affordable and effective)
- RAM: 2x32GB DDR5 6400 CL32
- Storage: 2x1TB Samsung 990 Evo Plus M2 SSD
- GPU1: NVIDIA RTX 3090 Founders Edition (wide and thick card)
- GPU2: ZOTAC GAMING GeForce RTX 3090 Trinity OC
- Power: 1200 watt – be quiet Pure Power! PSU. Yes, needed for those GPU’s and CPU.
- NVLink: NVIDIA GeForce RTX NVLink HB Bridge (4-slot, 30/3000 series)
- Riser Cable: PCIe 4.0, 90-degree connector, 15cm length
Assembly
Installed the RTX 3090 FE in the top PCIe 4.0 slot.
Used the riser cable to bend 180 degrees from the second PCIe 4.0 slot, allowing the connector to lie flat over the motherboard’s cooling profiles, creating the necessary two-slot spacing.
Addressed the difference in NVLink connector positions (31mm on the ZOTAC vs. 17mm on the FE) by leveraging the riser cable’s flexibility.
Used an empty PCI slot bracket with standoffs to create the correct offset in both height and alignment. (The fat blue wire in the picture to the right, is to hold the bend riser cable away from the fan of the 3090 FE).

 Riser Cable

Software
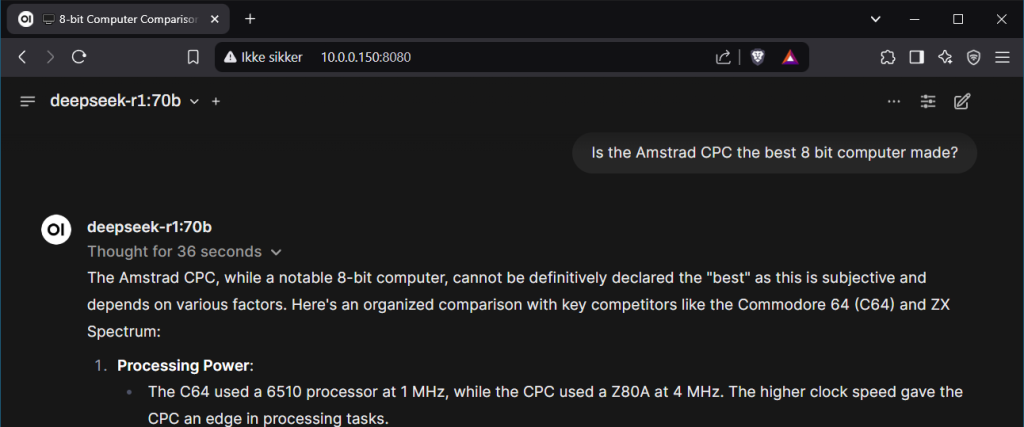
Once the hardware was in place, I installed Ubuntu 24.04.2 LTS, set up Ollama with various AI models, Open WebUI and SSH, so I could do everything remotely.
(Fine tuning needed?!)
Running
The airflow in the case is excellent, which is why I prefer to keep the setup away from my workspace (sounds a bit like a low noise air conditioner).
The maximum temperature reached so far when running DeepSeek-R1:70B is 73°C.
Final thoughts
This write up is primarily meant to help others who want to build a similar system. Information on this topic is scarce and scattered across the net.
Even though I bought my RTX 3090s second-hand, they are still very expensive. However, they remain one of the best options for running AI models at home due to their 24GB VRAM and Tensor & CUDA cores.
I might share further updates as I progress—there’s much to learn!
Maybe there will be a model/dataset with dedicated retro computer programming data – who knows 🙂
